
This page documents the steps I undertook to automate the daily data ingestion in a database we use on daily basis (Postgres in RDS). It can serve as a template for future application containerization. While this may be trivial for the DevOps team, it is certainly a bit outside of the usual data science skill set. While it is not uncommon for data scientists to run things via docker when they need completely isolated things, the Fargate part is something most data scientist will not touch in the usual workflow. This article is aimed for the data science team who might benefit from the basics. And for this reason, I might explain trivial things that a developer might not find useful.
There are three main steps in the data ingestion automation without dedicating a server:
- Portability: Make the ingestion script is portable so it does not have a dependency on any specific folder(s) on your local machine. Make sure your paths are relative if you reference to them in the main ingestion script. Also make sure you can call the script from the terminal and does not have to step through the interactive prompts.
- Containerization: Put your ingestion script in a docker container and test it works. Make sure you have test scripts that you can check without initiating the whole ingestion process. This will make sure your container works. In the test script, consider importing and using all of your dependency so you can test them out as well.
- Putting the code on cloud and scheduling the container
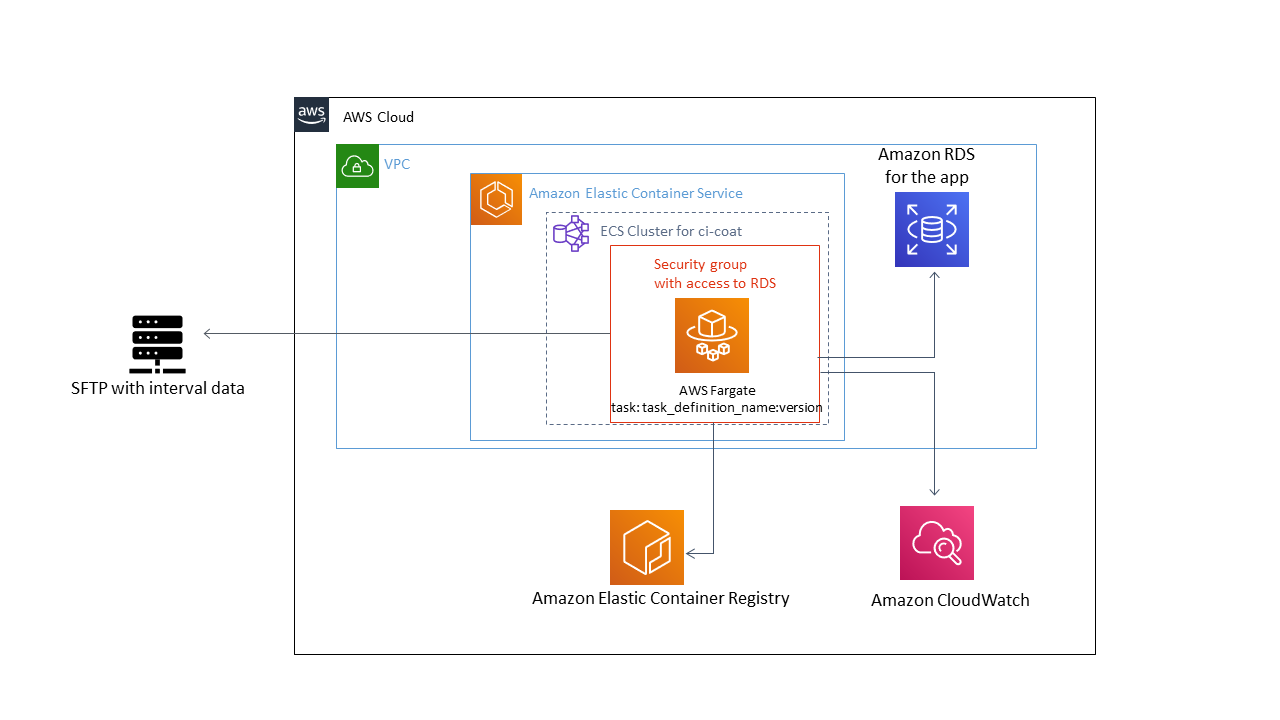
Here is the architecture of the serverless ingestion pipeline I have used:
Let’s detail each of the steps:
Portability: In the ingestion script, I have several dependencies on various libraries and their version.
- Python and OS variants: My local machine is Windows whereas the app runs on CentOS. The docker container will also be a a flavor of Linux. Therefore the development is done on windows but needs to be transferred to other OS. This implies I need to avoid OS specific dependencies. Anaconda distribution for Python presents itself as nice opportunity here as I won’t need to figure out (mostly) any OS specific dependencies by myself, but conda will handle those for me under the hood. o Memory limitations: Most of the daily dumps we receive can be handled with a 8GB RAM. But this means we will need to run lean in the code and optimise for memory wherever possible. Remember not to duplicate variables for the sake of convenience, and avoid vectorisation if that causes issues with memory. We don’t have to pay dollars for spending more time on this particular ingestion problem, but more RAM will be more money.
- Access credentials: I need to access the SFTP server programmatically where the daily dumps are pushed, and then need to be able to connect to the RDS instance to ingest data. This means I cannot go with hashes but need to supply passwords to the connectors in the plain text. I have couple of options including storing the credentials and DB details in a plain text file in plain text format or encrypted format. I can also go with reading the credentials from the environment. Other options, which are better from the point of security, is the store the credentials in AWS SSM parameter store and read from there.
- Relative file path: The ingestion script works by downloading individual files into the machine where the code is in execution. It needs a temporary directory which I just created using relative path. I also have a module defining a number of utility functions. The main ingestion script loads that using relative path as well. If you have a habit of using absolute path, this is a good time to switch to relative paths. It will save you a lot of pain down the line and your codes will be more maintainable.
- Python environment: How do you take your dependencies on other libraries to a different machine? Or replicate them for a different project? I am using
environment.ymlfile for conda but you if are using a different version, please usepip freezeor equivalent. Make sure you’re exporting this from the right environment. If usingconda, please remember conda affixes too much detail in the file and insert OS specific details in the file. Please remove everything after the second'='sign for each package in your.ymlfile to make it portable to other OS.
Containerization: This is the fun part where you bundle up the ingestion script in a separate OS and isolate them. I have used docker and suggest you use docker unless you know a better alternative. To start, just download the latest version of docker and install on your OS. If you’re on windows, I would suggest using powershell as your terminal. My cygwin didn’t support docker for some reason.
Dockerfile: Docker containers are defined by a
Dockerfile(without extension). It starts from a base image, usually a linux variant, and then installs dependencies for your application. I have gone through the route of usingminiconda(which is a slimmer version of anaconda) as my base image and just installed my environment on top.See my dockerfile below. It is commented for inline explanation:
FROM continuumio/miniconda3:4.8.2

# changing to this directory for nothing, just habit :(
WORKDIR app/

# Copy the file from your host to your current location.
COPY test.py .
COPY environment_lnx.yml .
COPY utils.py .
COPY obfuscated_creds.txt .
COPY <you log file>.log .
COPY <your main script>.py .

# create required python environment which has all my packages
RUN conda env create -f environment_lnx.yml


# if you need to create a directory
RUN mkdir temp

# the python script should be run within it own environment
# We cannot use conda activate within docker as every shell command runs in a new context
ENTRYPOINT ["conda", "run", "-n", "<you_env_name>", "python", "<your_script>.py"]
Docker Entrypoint: Note how I am running the main ingestion script (
dataRefresh_bulkUpsert.py). I need to do this as every single command in the docker is going to create a new shell. Therefore, the usual way of activating the conda environment and then running the script does not work..dockerignore: Once you define a
Dockerfile, please also create a.dockerignorewhich works similarly to gitignore file. I learnt the hardway (~1.88GB upload wasted) thatdocker pushwill somehow push the vscode IDE specific dependencies if you don;t exclude them. And then if you configured image scan on AWS ECR, it will complain about critical error. Here is my dockerignore file:.vscode/ .git/ __pycache__/Build it: Now is the time to build the container and test it locally. Use the following command to build. I have used the same name of the repository that I used in ECR for repo name. In
Powershell:docker build --rm -t your_namespace/your_repo_name .Note the
–rmswitch. It removes the dangling components after build and frees up some space. The-tswitch tags the docker image with the repository name. If you provide the name in<image_name>:<other_tag>then<other_tag>will be used as the tag for the docker image. Otherwise it will havelatesttag. I prefer to use time/date or other useful information for the tag. The DOT at the end indicates the build directory. You should run the command from the same directory where your Dockefile is. Otherwise provide the correct path.Check: After the build is done, run
docker imagesto see the built image. If you need to remove a particular image because you made a mistake or just don’t one, usedocker image rm ...(google for details - it can do untagging and removal of images)
The cloud stuff: Up until this point, we have not used anything to do with cloud. However, now we need to put our docker container in AWS.
- Setting up your local AWS config file: First download and install AWS CLI. Then run
aws configureto configure the default profile. You will need to get your access key and secret key from the Web Console. Once you’re done with that, please open the~/.aws/config, paste the following and put your details:
[default]
region = ap-southeast-2

[profile main_source]
source_profile = default
aws_access_key_id = XXXXXXXXXXXXXXXXXXXX
aws_secret_access_key = XXXXXXXXXXXXXXXXXXXX
mfa_serial = arn:aws:iam::<account_number>:mfa/<YOUR_USERNAME_ON_AWS>
region = ap-southeast-2

[profile new_role]
role_arn = arn:aws:iam:: <account_number>:role/AssumeRoleName
source_profile = main_source
mfa_serial = arn:aws:iam::xxxxxx:mfa/<YOUR_USERNAME_ON_AWS>
region = ap-southeast-2


[profile localdev]
role_arn = arn:aws:iam::<account_number>:role/AssumeRole2
source_profile = main_source
mfa_serial = arn:aws:iam::xxxxxx:mfa/<YOUR_USERNAME_ON_AWS>
region = ap-southeast-2
This makes sure you can assume the appropriate roles from the CLI. But you will need to be given the permission to assume these roles by the admin team. Get in touch with them if you don’t already have the access.
Elastic Container Registry (ECR): In the world of clouds, when we need to use a container, we put them in some sort of container registry so our applications can use them whenever required. Docker Hub is a popular public repositories for storing containers on the cloud. However, we need to keep our container private and AWS offers ECR for that. The first step for putting a container is to create a repository. For my ingestion, I have created this repository:
xxxxxxxxx.dkr.ecr.ap-southeast-2.amazonaws.com/your_namespace/your_repo_name. To create a ECR repo for your own need, you will need to assume the proper role if you don’t have the access.utting the container on the cloud: Next step is to push our container to this repository. For that we need to do three different things:
- Tagging: we need to tag our container with the repository URI for ECR. Make sure that the tag of of the image (e.g.
15July2020in my case) is meaningful. InPowershell:
docker tag your_namespace/your_repo_name:latest xxxxxx.dkr.ecr.ap-southeast-2.amazonaws.com/your_namespace/your_repo_name:15July2020- Getting the credentials from AWS so we can push things to ECR: It will ask you to provide the MFA code from your authenticator app on mobile. Make sure you replace the ECR URI with the one you need. This command gets a temporary credentials from AWS STS (that remain valid for 12 hours) and pass them to Docker login command for using in docker
push command. In
Powershell:
aws ecr get-login-password --profile <use_correct_profile_from_config> --region ap-southeast-2 | docker login --username AWS --password-stdin xxxxx.dkr.ecr.ap-southeast-2.amazonaws.com- Push the container: Make sure your ECR repo URI is correct. In
Powershell:
docker push xxxxxx.dkr.ecr.ap-southeast-2.amazonaws.com/your_namespace/your_repo_name- Tagging: we need to tag our container with the repository URI for ECR. Make sure that the tag of of the image (e.g.
- Setting up your local AWS config file: First download and install AWS CLI. Then run